


02-05-17: We have loved the floor so much we just put it in another room (dinning room). It is amazing how much my son still continues to help out. He is a dad’s best friend. I had to cut the flooring in the main entry so I could tie it in. Was super easy and the final result is awesome.


***(08-19-16) 3 years in and the floors only look better with age. 3 kids-a cat-and a 75lb greyhound rescue. We LOVE our floors more and more each day***
This is our first post on our first blog…sorry if it is a bit dysfunctional. This is a VERY easy and inexpensive project with high visual impact. You can do it…just go for it!!! What is the worse that can happen?? Let the fun begin…..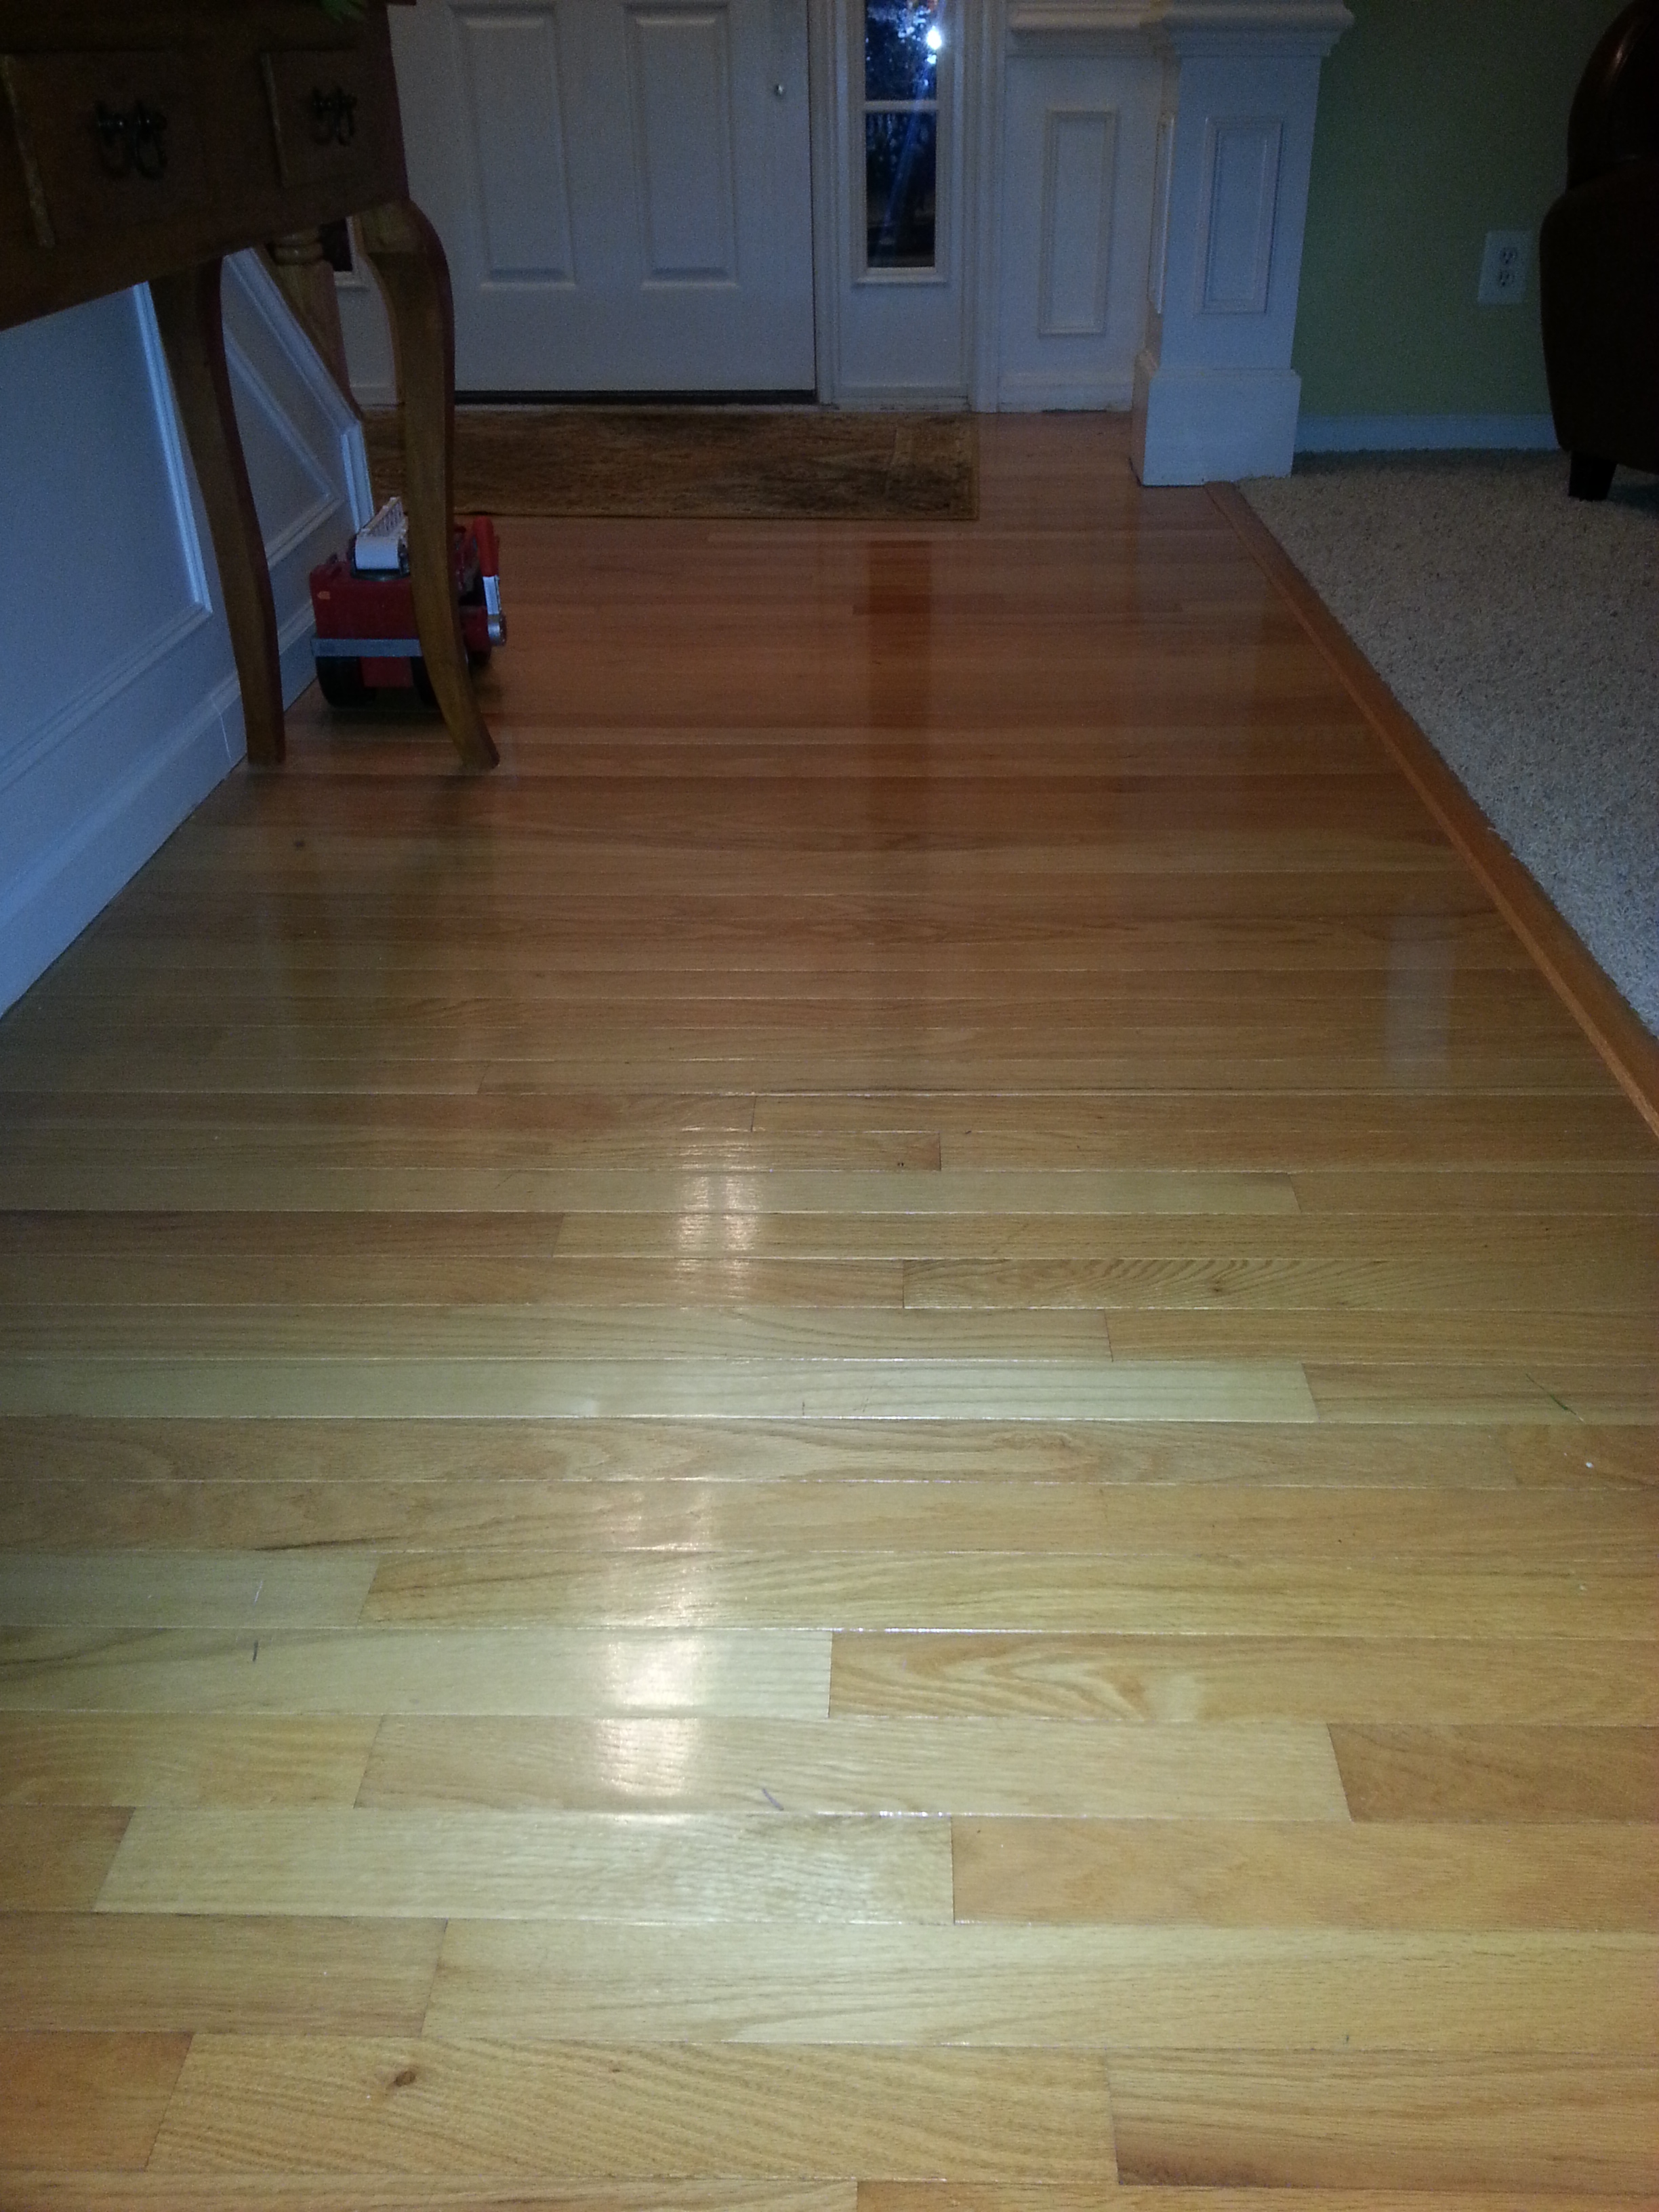
Builder Grade (boring) flooring

taking up old flooring ..son helped out

wife pitched in…big time

Vacuumed the subfloor
painted subfloor with black paint left over from another project so that subfloor would not show through the new planks and to seal the subfloor.


Dry fit every piece before gluing and nailing

Finished Product for roughly 75cents per square foot! That includes ALL materials.


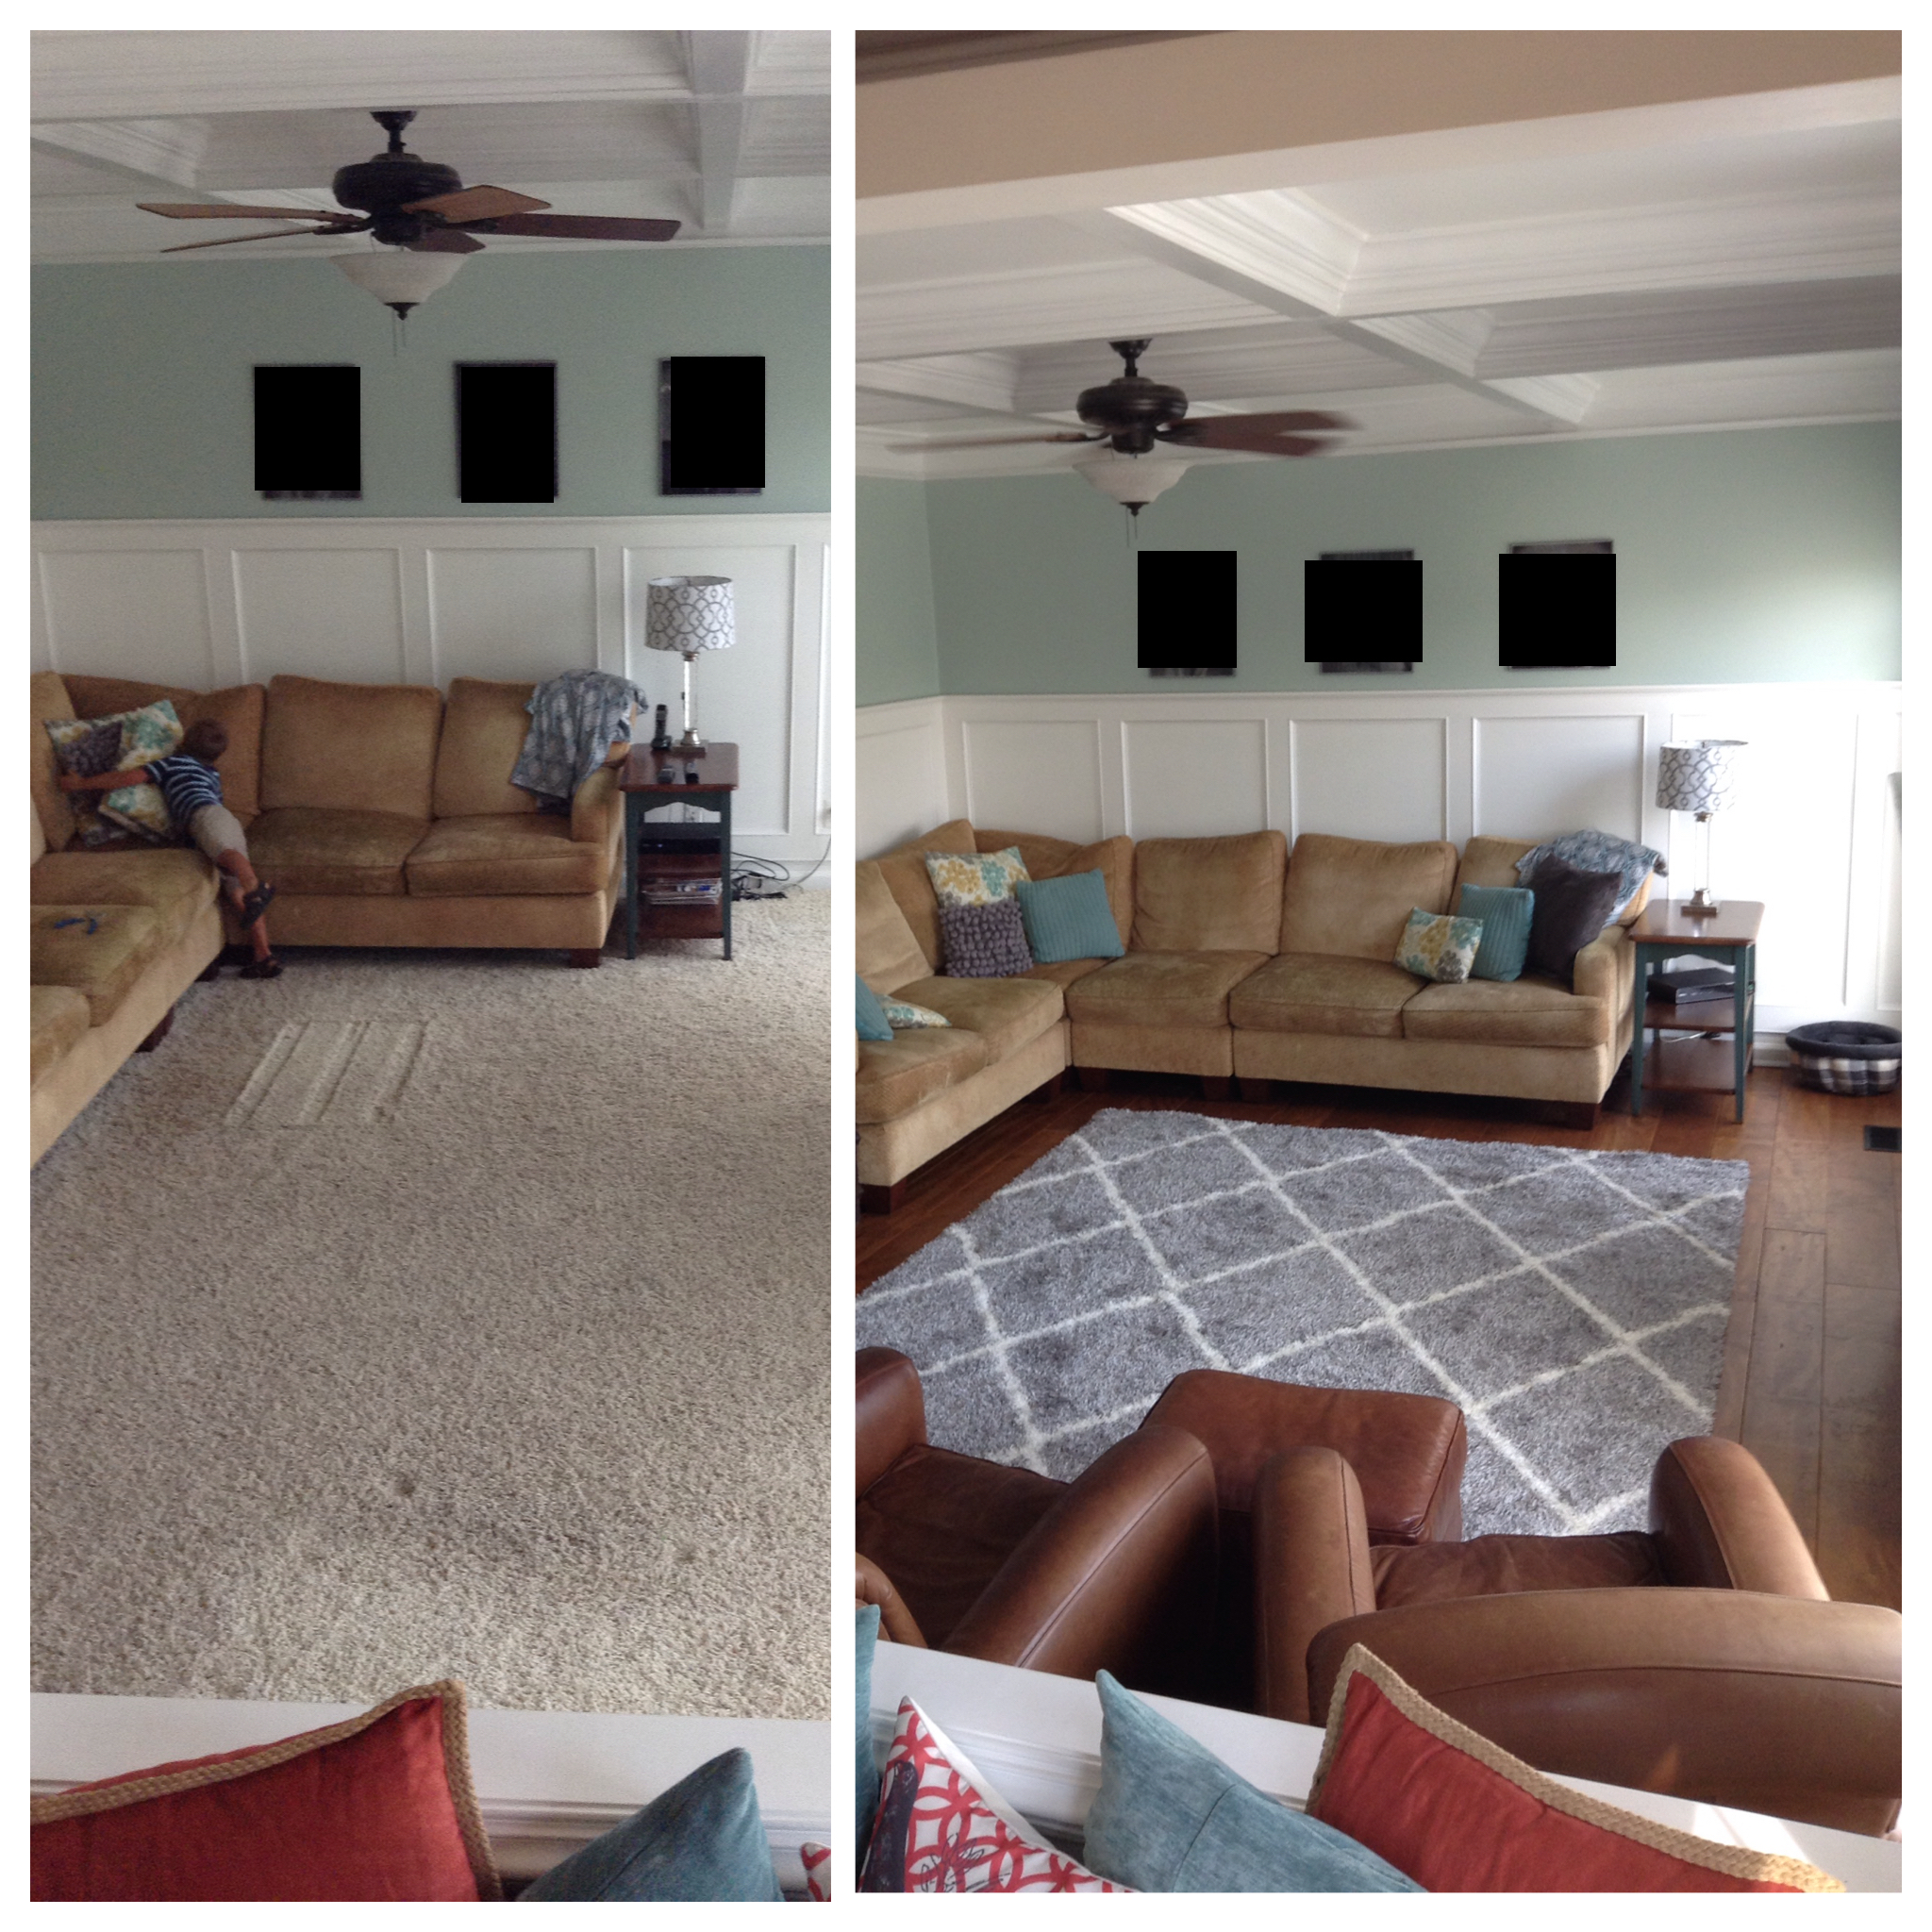
“Ply-wood: The several layers of wood that go to make up a sheet of plywood are placed so that the grain, of individual layers is opposite that of the preceding layer. However, the least amount of shrinkage will take place parallel with the face sheet grain. A typical sheet of plywood unrestrained will expand and contract 7/32″ over its length and over 3/32″ on its width. The amount of expansion and contraction will also depend on how securely the sheet of plywood is restrained nailed or otherwise fastened.” Hope this helps. 1. Buy knee pads 2. Use rubber surgical type gloves (they sell them at Home Depot in the paint department) with old socks pulled over them to add stain. 3. Use disposable stain pads to apply poly. I find them at Home Depot. They are less than $2 each and have a nice wide surface on a styrofoam handle. You can pitch them when you are done. They put on a really smooth even finish. I use them all the time. 4. Put on stain and 3 coats of poly BEFORE you install – then put 4th coat of poly after installed. 5. Use a power sander with 100 grit paper. SAND OUTSIDE BEFORE YOU INSTALL (LESS MESS) My power sander cost me about $40 and is well worth it. Also, anything higher than 100 grit won’t allow good penetration of stain and poly. 6. Pre cut and dry fit all of your boards. You will thank me later. Makes install fast. 7. Use water based poly unless you want to vacate your property for a few days. Also, water based goes on smooth. Since we were going for a rustic look…any repairs will require minimal effort…little stain..little poly…done. UPDATE: *** We are almost done with the living room!!!!! Will post pics soon. We have been wanting to do the living room for a long time and it looks awesome so far. We are removing a brick fireplace hearth too and running the wood all the way up. The nasty carpet is GONE 🙂 DONE DONE DONE and here is the before and after shot!
 We decided to remove the brick hearth to add a cleaner look and since the room is small, it adds square footage. I realized the thin brick was attached to a metal frame that just pulled out! It left the rest of the brick surround and mantel. We are thinking of whitewashing the brick to make it blend a bit better. ***Most modern gas only fireplaces with fixed glass (like ours) do not require a hearth extension. The manufacturers usually require a 36″ clear space in front (no furniture, etc.). Now if this was a wood burning fireplace that had a gas insert, the hearth extension would still be required. Once wood burning, always wood burning. (As a matter of terminology. The “hearth” is the “floor” located within the firebox, whether wood burning or gas. The “hearth extension” is the non-combustible material found in front of a fireplace. Both should be inspected. To call the “hearth extension” a “hearth” is common with many inspectors, but it is incorrect.) ***Check Your Local building codes before any re-models. ***

 Son Continues to be a BIG help.
 Rolling up the carpet and padding. My wife pulled the 1 million staples holding the padding down (God bless her)
You can see some of the new pieces and the original posted pieces “entry floors” as we begin the dry-fit (for some reason the 1 plank looks lighter but that is due to sunlight angle or flash…)
Rolling up the carpet and padding. My wife pulled the 1 million staples holding the padding down (God bless her)
You can see some of the new pieces and the original posted pieces “entry floors” as we begin the dry-fit (for some reason the 1 plank looks lighter but that is due to sunlight angle or flash…)

 We did the staining/finishing process the same as before, but this time we did not dry-fit most of the pieces. We decided to glue and nail the rows as we went since it is a big rectangular room and not a lot of cut-ins as the foyer had.
After Action Report – Lessons Learned: (plan to post pics of products used)
We did the staining/finishing process the same as before, but this time we did not dry-fit most of the pieces. We decided to glue and nail the rows as we went since it is a big rectangular room and not a lot of cut-ins as the foyer had.
After Action Report – Lessons Learned: (plan to post pics of products used)1. Took 10 full sheets off plywood ($20 per sheet). Had a few pieces left over. Home Depot ripped ALL 10 sheets in 8 inch strips!!!!!!!!!!!!!!!!!! They were not always happy but i tried to buy a few at a time and go during off ours (not weekends) which helped. 2. Two quarts stain (Varathane – color “Provincial” stain – one coat) 3. One gallon clear poly (Varathane water based poly for heavy traffic floors -3 coats) 4. Several sheets of 100 grit sandpaper 5. six tubes of floor adhesive and 16 gauge nails/gun 6. Nine 8 foot sticks of quarter round trim to cover gap where floor meets baseboard. 7. One small can black spray paint for A/C floor registers I do not have the exact amount, but I would say around $300 for entire project. We worked on staining/poly on weekends (outside) while weather was nice and then stacked them in the basement until install. It only took about 8 hours to install with plenty of breaks. It helped that there were not a lot of tricky cuts. With 8 foot long boards at 8 inches wide….it goes fast! SUPER EASY. SUPER CHEAP. BIG IMPACT!!!!!!!!!!!!

We have laminate wood flooring throughout our home and have had issues because of inconsistent humidity levels. Do you think if we used a barrier under this plywood flooring it may be better? We want wood flooring but we are struggling to figure out the best thing to do. We dont want to waste money. Thanks!
Sorry to hear that. How frustrating that must be. So I am guessing you did NOT use a barrier under the laminate flooring. Laminate flooring is basically pressed wood fibers (it soaks up humidity) with a photo of a wood pattern or a VERY little wood veneer over it. ALL WOOD and LAMINATE flooring should be left in the rooms it is to be installed and allowed to acclimate to the climate of that room for several days before installing (even plywood). You can use a barrier (we basically did with the exterior black paint that we used under the plywood flooring – which was applied to the subfloor). Again… I AM NOT AN EXPERT …ONLY A DIYer, but I would think plywood that has been acclimated to the area before install and some type of barrier will be better than laminate (that is my opinion). Hope that helps
Are you nailing into cement flooring underneath? Does your 16g nail gun use special nails for concrete?
Thank you
Corene
If you find ANY answers to applying this over concrete, please share with me. I purchased all of the products I need to do 800 sq feet I just haven’t had the boards cut yet. I have spent hours on the internet looking and can’t find anything!
Hi Wendy I hope is not too late to reply, I installed 3/4 in oak wood floor over concrete when everyone told me it couldn’t be done, I was told that I had to put a plywood floor first before installing planks wich I didn’t want to do and didn’t do and 6 years later still looks great! I bought a product sold at home depot that is used as a moisture barrier for shower walls and floors and it comes in a 5 gallon bucket at a cost of about $180.00 , I applied it to the floor as if was paint and when it dries it becomes red plastic and in addition I purchased the floor glue that also has a moisture barrier, I am not sure if the first product was necessary but it gave me peace of mind, needles to say a have a beautiful 5 in. planks white oak and would do it over again if I had to. I hope this is of help to you and good luck.
Thanks for the info Isabel! I am sure it will help a lot of folks move forward with their project.
Hi. I was wondering if you had any issues with splinters with the plywood floors. We are planning on using plywood as well and thought about getting a special sealant for decks. Do you think it’s necessary or just a poly coat?
Thanks for sharing your experience. Your floor looks fantastic.
no splinters. just pre-sand.
Your floors look fantastic! Would i be able to do this on a concrete slab?
Thanks! I would think you can, but you will have to research it first. I would Google “installing wood floors over concrete” or something like that. Plywood flooring is like engineered wood flooring you buy in the flooring department, just a lot less expensive. Good luck
I have completed 3 of my children’s bedrooms last summer using your pin and recommendations.We are getting ready to complete our master bathroom and hallway. Did you continue the flooring in the same direction throughout? What did you use as transitions between each room?
Bedroom…
That is GREAT!!! I would love to see pictures. Yes, I continued the floor and ran in same direction. No transition
I have tried to share pictures on here and I can’t figure out how to post them.
I am getting ready to do this to my closet (and if that goes well, other rooms)!! Do you feel it’s completely smooth? I don’t want it to be slippery smooth, but I also don’t want to risk any splinters!
I am getting ready to do this! Do you feel it’s smooth enough to never have to worry about splinters, but not too smooth that you’ll slip all over the place?
No splinters at all. I hit each board with a electric palm sander before I stained/poly and installed. The are slick – but no more than expensive wood flooring you buy at the store. Good luck
Did all the “gaps” fill in with the last coat of poly?
No and i did not intend for them to fill in. The poly went on before the install anyway but even if it didn’t, poly is like water so it would not have filled them in.
Floors look great! I actually purchased all of the supplies I need to do my entire downstairs. The wood is still at Home Depot uncut. I would be applying my floors over a concrete slab with liquid nails. I haven’t tested the concrete for moisture yet but when I do, if it shows moisture, applying a moisture vapor barrier (liquid) is very expensive. My other two hold up are people telling me that they are very slippery and easily scratch. They sucked the fun out of this project for me lol. I do have a one year old grandson as well as two big dogs. I am literally at a standstill right now over those three questions. And I’ve already ripped up all of my carpets. Any advice you can give on all of the above would be highly appreciated! Thank you
Ok….just remember that the more they are scratched the better they look. If they are scratched,just apply a little more stain on a rag (2 seconds) and it only adds character! They are as slippery as any other hardwood floor (no more..no less). As far as installing over concrete…look up installing engineered hardwood floor over concrete and it will be the same process (I would think you would install it with a trowed on glue – not liquid nails) Good Luck!
So, we live in the south, lots of humidity. I’m interested in doing my own floors, but your instructions gave me a hiccup. I’ve had actual hardwood floors before. I hated the little groove between rows that trapped dirt like no ones business! How do you deal with that!? And is your gap only between each row? Not at the end of each board as well? Does that make sense!
Ha ha…I know what you are saying. Yes…we have gaps all the way around (length and ends). We vacuum. The wider spaces/grooves in my floors actually are easier to clean than the tight ones in a tongue and groove floor. We have NO issues with keeping them clean (3 kids, cat and dog (dog is new addition #GreyhoundRescue). If you just hate the idea of a groove you may want to go with carpet or tile and stay away from wood floors. They make some really nice tile that looks just like wood floors but its more $ than these plywood floors. Hope that helps
How is this for spills? I foster puppies who frequently have accidents and even though I was told that they would be ok, they are starting to bubble on the edges of the boards.
I am sorry to hear that you are having issues. Any wood floor that is in a wet area (kitchen, bathroom, etc) or an area where you have issues with standing liquids that are not cleaned up IMMEDIATELY, ALL WOOD FLOORS WILL WARP. You can repair/replace the damaged floor and then make sure you seal all cracks and edges with a waterproofing top coat (including the subfloor). This will help keep water damage from occurring until you can get the liquid up. Hope that helps.
We just completed our living room and kitchen area, we absolutely love how it out, just curious how long did u wait to put furniture on your floors?
WOW….THAT IS GREAT! Love to see before and after pics. We put furniture back on them the day we installed them since we stained and put the poly on before we did the install. That being said, I guess it was a few days, but read the back of the poly can and find out when they recommend it.
Did you sand after your first coat of poly? I’m reading about “dewhiskering”. Did you do this?
No. I did not sand between coats
Could you tell me what is the color of your walls? Is it blue or grey? Love it
Thanks! We love the color. It is Copen Blue paint color SW 0068 by Sherwin-Williams.
Love your floors! I have been considering this avenue for my bedrooms. The After Action Report was a nice touch and much appreciated. Question….what did you treat the plywood subfloor with first? You mentioned “black exterior paint?” Would you mind clarifying? Thank you!
Thanks! I used black paint so that you could not see the sub-floor between the cracks of planks. I used exterior since it is water resistant (made for outdoors) and if there was a spill, it would not ruin the sub-floor. Any black exterior grade paint will do. Hope that helps
Why didn’t you stain & poly after installing?
It is a lot easier to sand, stain, and poly prior to install when you have kids and pets. No smell, no mess, quick install time, can move furniture and family back into the space as soon as you nail the last board down.
How did you do the stairs? Are they wood as well? I’m not sure about gaps in the floor, could the boards be cut with a tongue and groove to help with that?
We did not do the stairs, they are carpeted. I hope to do the stairs soon and when I do I will post the process on the blog 🙂
I would say to you and anyone else…if you don’t like the thought of gaps…then don’t do this type of flooring. Sorry…but it is part of the plywood flooring thang. ha ha.. In the historic days…they did not have tongue and groove until much later and in nicer homes. Most historic homes and later farm homes (1700-early 1800) had a butt joint install. If you tongue and groove your plywood planks you will have to have the right tools and time…and if you don’t…you will spend a lot of money on the tools and negate the savings of having the plywood flooring, but that is your choice.
We have had gaps in our plywood flooring for several years now. We have 3 kids, cat and dog (dog is a new addition-75 pound greyhound rescue) and the gaps have NEVER been an issue. Regular vacuum keeps the floors and gaps clean. REMEBER – 70 cents per square foot (total) for 8 inch wide x 8 foot long rustic wood flooring!!!! 🙂
I love how your floors turned out! They look great. We are going to be laying plywood as well, but I do have a question for you regarding the black paint. We are pulling up old linoleum tile that was glued down with some kind of tar? In my reading it seems this tar glue may also acted as a vapor barrier, but I’m no expert 🙂 I’m tempted to skip the painting step because of the tar being there but I’m not really sure if its a wise choice. Would you mind sharing your diy opinion? Thank you 🙂
Thanks! Not sure how old your linoleum tile is (no asbestos I hope???) Not familiar with the “black tar” either type adhesive either. Also you did not mention if you are putting it over a concrete subfloor or plywood/OSB. I would say that if the “tar” covers the entire area and is level (not uneven and chunked) you should be ok. But you can always put a layer of paint over the tar too. I probably would have painted black exterior paint over the linoleum and laid the plywood flooring on top of that. 🙂 not sure if this helps…..
Love this flooring! I’m new to dealing with lumber and everything when it comes to DIY projects. Looking at the home depot and lowes websites, it has quite a few options for the “thickness”(?) of the plywood. What do you suggest?
We used 23/32 in. thick 4 ft. x 8 ft. plywood RTD Sheathing from Home Depot (about $20-$23 a sheet)
Love your floors! BUT….how are they holding up? I keep reading mixed reviews on how durable they are. We have 6 kiddos running around, the last four being boys. I am worried it will not hold up.
Why didn’t you just use 1×8 pine boards? Is the plywood better?
I believe engineered wood floor is some of the best and that is basically plywood with a veneer over it. It is stronger and will not shrink, swell, split, cup, etc like using plain pine boards. In historic homes they used heart pine flooring. Heart Pine is the heartwood of the longleaf pine (Pinus palustris) tree. Because of properties particular to this species of pine, Heart Pine wood is extremely hard, strong, and stable, making it an excellent wood for flooring. It is expensive. If you use just plain pine planks from Home Depot, they are mostly sap wood (which means very soft) and very susceptible to cupping, splitting, swelling, shrinking, etc.
plywood is better for flooring due to multiple layers and it won’t cup and twist like regular pine boards
Definitely going to do this! There is an apartment underneath us. Could we add a layer of something underneath the plywood to muffle the sound? Do you find it squeaks at all?
you would use the same application as installing another hardwood flooring. Check out some of the flooring sites for great ideas how to deal with your issue of apartments and putting down an underlayment. Our floors DO NOT squeak but we used nails and glue. We do have a basement too so it is similar to what you are looking to do.
Pingback: Distressed Wide Plank Flooring Maryland - Blog about Flooring Ideas
I just wanted to say great post! Very well written and I appreciate all the little details and notes you add. It really makes a difference to beginners and do-it-yourselfers like me in clarifying each step. Thank you.
WOW…thanks for the feedback!
Looks beautiful in the pictures. How long has it been down? I know that pine plywood can have voids, in the plys. I would be concerned, about the voids.
several years and no problems what so ever. LOOKS GREAT
Excellent post and the floors look beautiful, as many others have mentioned. One question that I have not noticed yet is in regards to the adhesive. Liquid Nail strikes me as a relatively permanent adhesive. I’m guessing that if you have to pull up any of the planks that it will probably damage your subfloor. I’m thinking about not only potential repairs that may need to be done, but also am thinking about the person who may choose to pull up the floors and install something different in the future, and what that experience will be like for them. Seems like they would need to install their choice of flooring on top of the plywood planks rather than pull them up. What are your thoughts on this? In hindsight, would it have been better to use a different adhesive? Thank you! Also, I can’t wait to see photos of your stairs once you decide to do them too!
I get it…I do but I lay a small bead of liquid nails and will continue to do so. I have pulled some of the boards up to feather in more of the same flooring in other rooms and the damaged to the subfloor was minimal. I putty knife and some wood floor repair filler fixes it up in seconds.
Thank you very much for your post. It is super informative and helpful. We are looking at possibly using your method for about 1500 sq ft in our house we are remodeling. One question…aside from vacuuming, how do you “mop” the floors? Would a steam mop work without damaging the floors? Not sure what to think about the moisture in the gaps. Thank you!
you treat it like any engineered hardwood floor. we use a wet jet to mop but a steam mop should work too as long as you go over them like you would another hardwood floor.
I really enjoyed reading your post! We are looking to redo the floors in our kitchen and living room and were really struggling with which direction to go. I love the idea of having real wood floors but figured that the plywood options just wouldn’t hold up and real wood floors are out of our price range. I love that you have had these for three years and that you’re loving it even more! I love the slightly distressed look and the character that it brings. You give us hope and inspiration and we’re excited about your results!
THANK YOU! We really do love them and if you are looking at solid hardwood floors verses engineered wood floors (which are expensive too and are just plywood with a thin veneer) the plywood holds up GREAT. Just go for it! Try a small room first like we did and see what you think.
Hi! What a neat idea for the floors! When nailing were the nails face planted or edge planted? A picture up close would help. Thanks
Face nailed
Is this project possible for some one with no power tool (or practically any tool) experience? I would love to try this. Also, does a DIYer need some kind of saw for this project, to cut the planks to fit for install? Your tips are greatly appreciated!
if you can get Homedepot to rip the boards then you only need a hand jigsaw to make the finer cuts and the saw costs about $25
Love the floors. In your post you stated you would do the last coat of poly after installing the floor. But, in your reply July 30, 2016, you stated lay the last board and you are finished. Did you not apply a coat of poly after installing the floor? Also, does the paint portion of the sub floor have to be black exterior paint? Could dark brown exterior paint be used?. Thank you .
sorry for the confusion. I did put all layers of poly on first before installing in the family room and hallway but in the dinning rooms I put the last coat after the floor was laid. You can use whatever dark exterior paint you want. i wanted black so it mixed with the shadows and did not show brown subfloor through the cracks.
Hi! I’m working on a collection of plywood flooring tutorials (a roundup) to publish over on Remodelaholic, sharing a few FAQs of plywood floors and linking back to the full tutorials (like yours here) — I would LOVE to include this! Will you please email me at hello@remodelaholic.com so I can fill you in on the details of being included? Thanks!
What is the black stuff you painted on the sub floor? I’m assuming it is a vapor barrier but what brand? We have been researching those:) Floors look great! I have been researching these for over a year and I appreciate you continuing to come back and update. We hope to do this in our den for starters and then go from there.
You mentioned putting stain over scratches, do you do additional poly too?
Also, how do you think these would hold up in a kitchen? Any recommendations on waterproofing around the sink area? Have you ever had to pull up and replace a board? I’m wondering how hard it might be to replace one if it warps…
If the scratch is small and shallow and thin, I do not add poly. I would not put hardwood in a wet area (Kitchen, bathroom, laundry room). I had to pull up some boards when I added the floor to different rooms so I could blend in the new room and it was not hard.
it is exterior grade black paint which is water proof since it goes on the outside of your house.
Did this about 25 years ago except we just laid the 4×8 pieces & drew plank lines & nails with permanent marker. It was a small room with area rug, so much was covered. Everyone who saw was amazed & had to feel the lines ro make sure they weren’t real.
Great post, I have loved this idea for ages.
We are in the process now of finding ply sheets of suitable thickness, they aren’t quite so inexpensive here in Australia.
We’ll let you know how we progress using your great advice.
Thanks
Virginia
SW Rocks
NSW Australia
I want this on my walls, any suggestions for me?
Just make sure you nail into the studs
I am wondering?? would the sanded plywood be ok to use the price difference here is not much but I think regular ply is 1/2 inch thick and sanded plywood is 1/4in thick what are your thoughts
I would be concerned with the floor holding up when it is that thin. If you have a good solid foundation it might be ok. you can always try it in a not so visible room first
You did amazingly on both projects! And thank you for sharing with us! Our carpet is disgusting and we haven’t had time or money to do anything about it for the three years we’ve loved here but, after discovering diy plywood flooring, I am sold! I’ve scoured the internet reading every diy plywood flooring post I can find to make sure I do it right but there’s one question I have yet to find an answer for…. My parents are in our basement apartment and even with carpet we can be pretty noisy for them. We have two very active boys (plus all their very active friends) and a dog. So, I’m wondering if there is a sound barrier that would still work if wood is nailed to it OR have you heard of anyone ONLY gluing the planks, no nails? Any insight would be SOOO appreciated!! 🙂
I am so sorry for the late response. I have had family issues over the last year. The only way to lessen the noise in our house, we have kids and pets, was to install heavy insulation batting when we finished the basement ceiling. I don’t think anything would help, that you would notice a difference, while installing the plank flooring. sorry.
I am so excited to try this on our Living Room floor. Lowe’s is being awesome and ripping all the wood for me as well! Thank you so much for sharing how you did this! It looks amazing!!! I do have one question: How long did you let your stain sit before wiping it off? The depth you have on your floors is about what I am looking for. Thanks so much!!!
I am so sorry for the late response. I have had family issues over the last year. When staining I just loaded the staining pad and ran it all over the planks without wiping off unless there was a puddle or drip.
What are your thoughts to apply this process on walls?
I am so sorry for the late response. I have had family issues over the last year. My brother did it and it looks awesome!!!!!
We are also considering these floors. How did you do the transition from the wood to the tile in your kitchen? Can you show a picture of that? Thanks for the great details!
I am so sorry for the late response. I have had family issues over the last year. I used a pine wood floor transition piece I bought at Home Depot in the flooring department. It is made to go from hard surface (tile) to hard surface (wood). They also make them to go from hard surface to carpet. Just ask at any flooring place and they will know what you are seeking
I was thinking about using 1x planks or even unfinished pine flooring as it’s still greatly cheaper then hardwoods. Do you think that pine is better? Are the pine boards softer then the plywood?
I am so sorry for the late response. I have had family issues over the last year. I am not exactly sure what you are asking. Pine is a soft wood and should be the same durability weather its pine plywood or a board. I used the cheapest pine plywood I could find at Home Depot. I like all the dents and dings life brings to my floors but if you dont like that you might want to go with a hardwood plywood.
Am currently in the “sand until your arm falls off” stage of our guest room project on 15/32″ extremely rough sheathing costing us $23.15 a sheet (Inflation). I was planning to go to 180 grit, but after reading your post will stop at 120 grit. (which I’m currently in the middle of) Had to fill many holes where the knots popped out, or huge splinters chunked off, or there were cracks clear down to the the 2nd layer. So much appreciate your post, it was super informative especially the part about gaps, and your floors look amazing. Did you have problems with ragged split edges, cracks and big holes where knots had popped out, and if so how did you deal with that?
I am so sorry for the late response. I have had family issues over the last year. I did not have any split edges and had no problems with knots. The ends are cut with a finish blade on my miter saw and the length was cut at Home Depot. I sanding the length edges smooth…rounding them over a bit for safety and to make them appear old and worn. I did not use any filler. If the knots were bad (popping out) I just used another piece.
After viewing at least 1,000,000 post, you floors are the BEST OF THE BEST!
I love the color. They look like “real” 😏 hard wood floors. Thank you for sharing. I hope I will be able to do this in my home. ☺️🤦🏼♀️ If I’m not ttttooo old. 👵 slow and steady is my motto.
I am so sorry for the late response. I have had family issues over the last year. THANK YOU SO MUCH for the compliment. YOU CAN DO IT!!! Once you start you will realize how easy it is. DONT overthink it. 🙂
Please help! I’m so excited – inspired by you and others, we are 90% done with our plywood plank flooring. I am at the point where I need to put the finish on. I was not able to poly any of the boards first because I did not have anywhere for them to dry so I am doing all four coats with the boards nailed in. I used varathane oil based stain. I am using varathane water-based floor finish. I read that I need to let the oil based stain cure before putting on a water-based finish and I believe it is now ready. I am stuck at how to apply the finish. Your blog says you used disposable stain pads from Home Depot. Could you possibly link exactly what you used? I am really nervous about the finish. And I do not want to spend $50 on a T Bar applicator. I was going to use a paintbrush but I’m afraid the Finish will go on too thick. If I could find out exactly what stain pads you use I would feel more confident going forward!
So sorry for the delay. I have had some family issues this last year. You do not want to use the disposable pads I did since you are doing the floor after it was put down. The water based Varathane is very forgiving. you will be fine. Just use and stick with a stain pad screwed into the one end so you dont have to bend down. Here is a link of what you need https://www.homedepot.com/p/Shur-Line-9-in-Tear-Resistant-Deck-and-Stain-Pad-Refill-2006127/202080288
Hi, I’m a DYIer also. I was researching using 1×4 pine boards
but it is a soft wood as you said. I think I’ll do your way
using plywood strips. But I don’t want gaps. It would be a
dirt catcher. I do like the gluing down as well as nailing down the wood.
I’m wanting to do this in a mobile home.
Thank you,
Carol B.
I think the 1×4 pine boards would be a bad idea so going with the plywood is a great idea. You can butt join them so you do not have any cracks and might be ok but if you were to butt join 1x4s you would have buckling and warping. Thanks
Hi, love your blog on the plywood floors. I have recently leased commercial space (650 sq ft – 50 of which is bathroom and we plan to install stone tile in there) ground floor, main street, in a 100 year old building. I would do a really dark stain, old world stain. I just got quotes for laminate at aprox $2800, $3200, $5600 and then one $4600 for Douglas Fir planks to be barged in from Washington State. Of course this does not include the cost for a contractor to install. Trying to keep start up costs down. Because this will be a walk in location for customers, I was thinking of doing this with 1/2″ Marine A/B plywood for the quality of hardwood plywood vs the cheap pine plywood from Home Depot. Since I’m in Alaska on an island, I would have to wait anyway to get off my island to buy cheap plywood, be in Puget Sound, hit up a Home Depot, have them rip the boards, rent a U-Haul truck, haul it all to Alaska Marine Lines on the downtown Seattle waterfront, throw it on pallets and ship it to myself. (Standard m/o if you live here and want something) The floor is uneven, (don’t feel like leveling it it, nothing in a 100 yr old building is truly square anyway.) Also, the building is on pilings over salt water on our waterfront. I have 4 white, bare walls and ceiling, it has a bare sub floor with left over linoleum pieces to pull up. Paint it dark and slap down plywood planks. I want to be up and running by late spring. I have a contractor to install all lighting and electrical, and myself, husband and son will do all painting and whatever we can to keep costs down. I plan to make curtain rods with industrial black steel plumbing pipes and joints and make my own curtains out of burlap. ( The custom blind quote came in at $3200.) Our local lumber and hardware store here will rip the plywood for me. The 1/2″ A/B Marine plywood runs $68 a sheet and I estimate I would need 19 sheets. Whadaya think? Am I crazy? Haven’t seen any blogs or uTube vids with anything close to my circumstances.
WOW…I can not believe the hoops you have to jump through getting material. I am an avid watcher of Building Alaska show on TV so I know it can be hard and expensive. I originally saw a blog where a woman used the plywood floor in a 100plus year old retail shop and that is when I fell in love with it. I agree that the floor and walls in a space that old are never perfect but for me..that is what makes it perfect. Since you are in a wet and salt environment I think its a good call to use Marine grade plywood. If you run into any really bad spots you can always shim the planks before you put them down. Go for it!!!!!!
Hi acm3, Thanks for the feedback. Every little tidbit helps. Yes, expensive and tedious to get materials. Even if cost isn’t a factor; where I live, availability or lack of it can out weigh the cost factor. To top it all off, I live at the top of 80 stairs (one way) on the hill behind the shop. 🙂